I have been really lucky, the last three houses we have lived in there has been a spare room that I can use for my craft room. Its wonderful to not have to use the dining room table for projects (although I do still use it for cutting out patterns) and then clean up before dinner. I can close the door and leave a project in the middle. But these spare rooms have always had to serve dual purposes, as storage, or a guest room, And to compound the fact that the space is not entirely mine, I have always had to work with hand-me down storage. But just a few weeks ago we made it work so that I could get a new shelf from Ikea. I love it! It has made a world of difference in the craft room and inspired me to make some other changes as well. Let me take you on a before and after tour.
 |
| Before |
 |
| After |
My parents gave us a twin futon so that the room can do double duty as a guest room. Before, it was in the way when not in use and hard to get to when it was unfolded. Now it can be out and set up all the time. I can use it as a place to read, or do a bit of hand work (the light is great) and we are ready for guests any time.
 |
| My two, ill-fitting hand-me-down shelves. |
 |
| Brand new, everything fits Kallax! |
I rearranged in order to make the guest bed have a permanent home. The new Kallax is slightly less storage than I had before, but I'm ok with that since it means things are tidier and easier to find. In the process of putting things away on the new shelf I threw out a bunch of things and also moved some stuff to basement. I figured that if I hadn't used it since we moved into our last house I could get rid of it.
 |
| Before |
 |
| After, doesn't look that much different. |
So my actual sewing space hasn't changed that much, but the rest of the room is so much better. The table is my grandma's old sewing machine, unfortunately it needs to be rewired so it is currently not functional, but it make a great perch for my trusty Viking Emerald.
Let me show you a few more cool things about the new space.
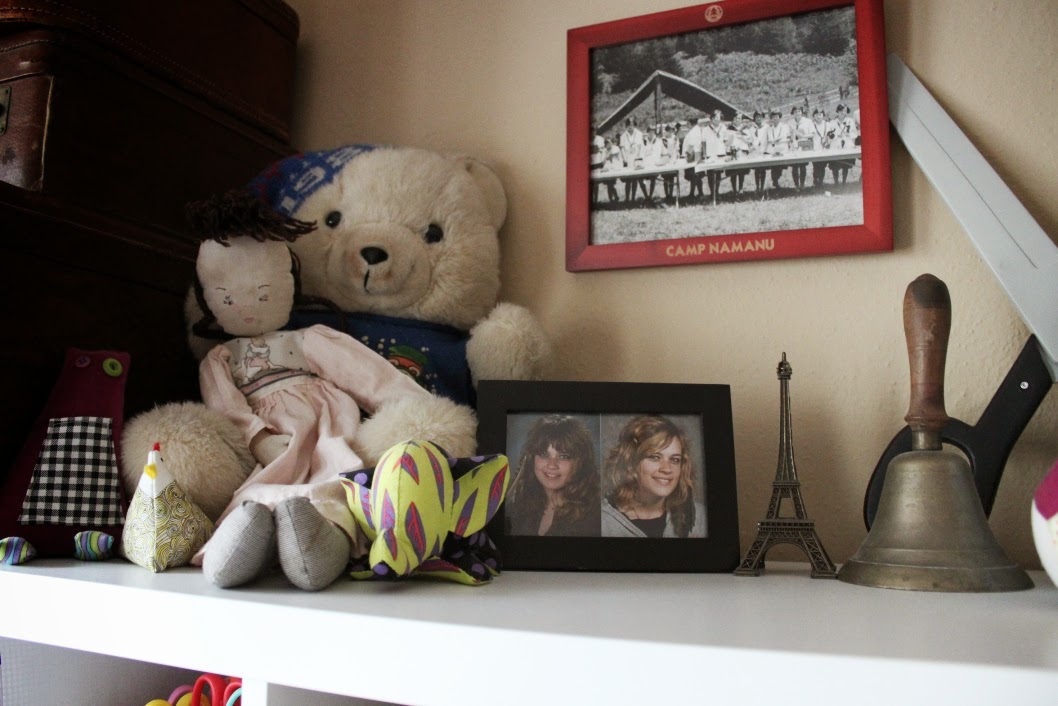
This teddy bear has a hat that says 1988. My uncle gave it to me this spring and told me he bought it for me when I was a baby but then he liked it so he kept it and started a teddy bear collection. He had to get rid of the collection and figured I should have this bear, you know 26 years late. I've also got a few softies I made, my doll from when I was a kid, and the chicken was brought back by some friends who went to Hawaii for their honeymoon. Pictures of my sister, and Camp Namanu. I've got my grandma's old school bell and my giant scissors. It is so nice to have some room to display things.
The shelves are jam packed. For now I've got the bins I had before. But I would like to get some pretty ones that all match. If you have any recommendations on where to look or specific models, leave them in the comments. I also want to get some nice labels for the bins and the shelves.
Close up of the guest bed. Doesn't it look nice and cozy? This is a scrap log cabin I made a few years ago. It is super warm, I put two layers of batting, and here it is doubled over. Probably too warm for the fall, but it looks nice and was on the top of the stack of quilts in the closet so it ended up on the bed. I'd like to get a little stool that can be used as a night stand as well. And really long term I'd like to get some kind of day bed frame and get the mattress off the floor. I actually hemmed the curtains, we've been here almost a year and I finally did it.
This space still needs a little work, but it is a vast improvement over the space before. Thanks for letting me show you around. Let me know what you think!